
Master facility automation with a clear, step-by-step guide. Learn the eight phases to ensure success and avoid costly rework.

Facility Automation Step by Step: The Playbook That Works

The fastest path to working facility automation runs through eight sequential phases: governance, baseline assessment, use-case prioritization, architecture and technology selection, a measurable pilot, ROI validation and procurement, commissioning, and operational handover. Skip a phase and you inherit its cost later, usually as an expensive rework during commissioning.
Here's what to do in the next 72 hours. Call your operations lead and your IT/OT security contact before you call any vendor. Pull three documents: the current sequence of operation, last year's utility bills by meter, and your open work-order log. These three artifacts tell you more about automation readiness than any sales demo.
A minimum viable first pilot looks like this:
- Pick one building or one system (chillers, lighting, or access control), not the whole portfolio.
- Name one executive sponsor and one site owner who signs off weekly.
- Define two KPIs you can measure with existing meters or a handful of retrofit sensors.
- Set a hard 8 to 12 week pilot window with a go/no-go date on the calendar.
Key Takeaways
Facility automation succeeds when governance, baseline data, and a scoped pilot come before any platform purchase, and fails most often when teams reverse that order.
| Point | Details |
|---|---|
| Sequence beats speed | Follow governance, baseline, use-case prioritization, architecture, pilot, then scale, in that order. |
| Document the SOO first | A current sequence of operation prevents mis-tuned controls after installation. |
| Never skip FAT | Factory Acceptance Testing before site delivery avoids prolonged, disruptive on-site fixes. |
| Adoption drives ROI | Intuitive dashboards and real staff training determine whether automation gets used at all. |
| Beyondsensor supports sensor-first pilots | Beyondsensor pairs sensor deployment with gateway integration and analytics enablement for a faster, integrated first pilot. |
Table of Contents
- Step 1: Define Objectives, Scope, and Governance
- How Do You Assess Current Systems Before Automating?
- Which Automation Use Cases Should You Prioritize First?
- Step 4: Design the Field-to-Application Architecture
- Step 5: Plan and Run a Measurable Pilot
- Step 6: Validate ROI and Plan for Scale
- Step 7: Commission, Test, and Hand Over the System
- Step 8: Build Change Management Into Daily Operations
- What Are the Most Common Facility Automation Pitfalls?
- A Sensor-First Approach to Facility Automation
- What I Learned From a Pilot That Almost Failed
- How Beyondsensor Supports Your Automation Pilot
- Sources
Step 1: Define Objectives, Scope, and Governance
Every facility automation project that survives past year one starts with objectives someone can measure, not aspirations someone can argue about. Pick 2 to 4 KPIs tied to what actually matters at your site: preventive maintenance (PM) compliance percentage, hours of reactive maintenance avoided, energy kWh reduced per square foot, or occupant comfort complaints per month.
Scope comes next, and scope creep kills more automation projects than bad hardware does. Decide upfront which sites, systems, and asset types are in play, and count your points. A 200 point chiller plant pilot behaves very differently than a 2,000 point campus rollout.
Governance is where most teams under invest. Build a simple RACI: who is Responsible for daily execution, Accountable for the budget, Consulted on technical decisions, and Informed on progress. A small steering committee meeting regularly is usually sufficient for most pilots.
- Draft objectives and map each to a measurable KPI.
- Set pilot scope boundaries (sites, systems, point count).
- Assign RACI roles and procurement approval thresholds.
- Confirm a communication cadence with stakeholders.
Pro Tip: Write your KPIs before you talk to any vendor. Vendors will happily reshape your success metrics around whatever their platform already reports.
How Do You Assess Current Systems Before Automating?
Start with an honest inventory. List every controller, sensor, and communication protocol on-site, then grade each one for data quality, not just presence. A sensor that exists but hasn't been calibrated in three years is worse than no sensor at all, because it produces confident, wrong numbers.
Capture baseline metrics before touching anything: runtime hours, energy meter readings, fault counts, and PM compliance rates. These numbers become your before-and-after proof for the ROI conversation in Step 6.
- Confirm trend logs exist and go back at least 90 days.
- Check whether BACnet or Modbus points are actually exposed, not just theoretically available.
- Ask whether sequences of operation are documented and current, since outdated control documentation is the single biggest driver of mis-tuned automation.
- Decide if retrofit sensors solve the gap or if controller-level upgrades are unavoidable.
Pro Tip: If nobody on-site can produce a current sequence of operation document, treat that as a red flag before you treat it as a formality. It usually means the last automation project was never fully closed out.
Which Automation Use Cases Should You Prioritize First?
Not every automation idea deserves a pilot. Score candidates against four factors: business impact, data readiness, implementation complexity, and safety or regulatory risk. The winning use case is rarely the flashiest one. It's the one where you already have decent data and a clear owner.
Common high-value starting points include predictive pump or motor maintenance, demand-controlled ventilation tied to occupancy sensors, and automated maintenance request routing that replaces email-based work orders with rules-based scheduling.
- List candidate use cases from stakeholder interviews and open work orders.
- Score each against impact, data readiness, complexity, and risk.
- Select one or two for pilot scope, no more.
- Confirm a KPI definition and execution owner for each selected use case.
Before greenlighting any use case, confirm three things: the data actually exists, the KPI is written down, and one named person owns execution. Vague ownership is how pilots stall at week six.
Step 4: Design the Field-to-Application Architecture
Facility automation architecture works in three practical layers. The field layer holds sensors and actuators, physically touching temperature, occupancy, pressure, or motion. The control layer holds programmable controllers and gateways that execute logic locally, often with edge compute for latency-sensitive decisions. The supervisory and application layer aggregates data, runs analytics, and gives your team dashboards and alarms.
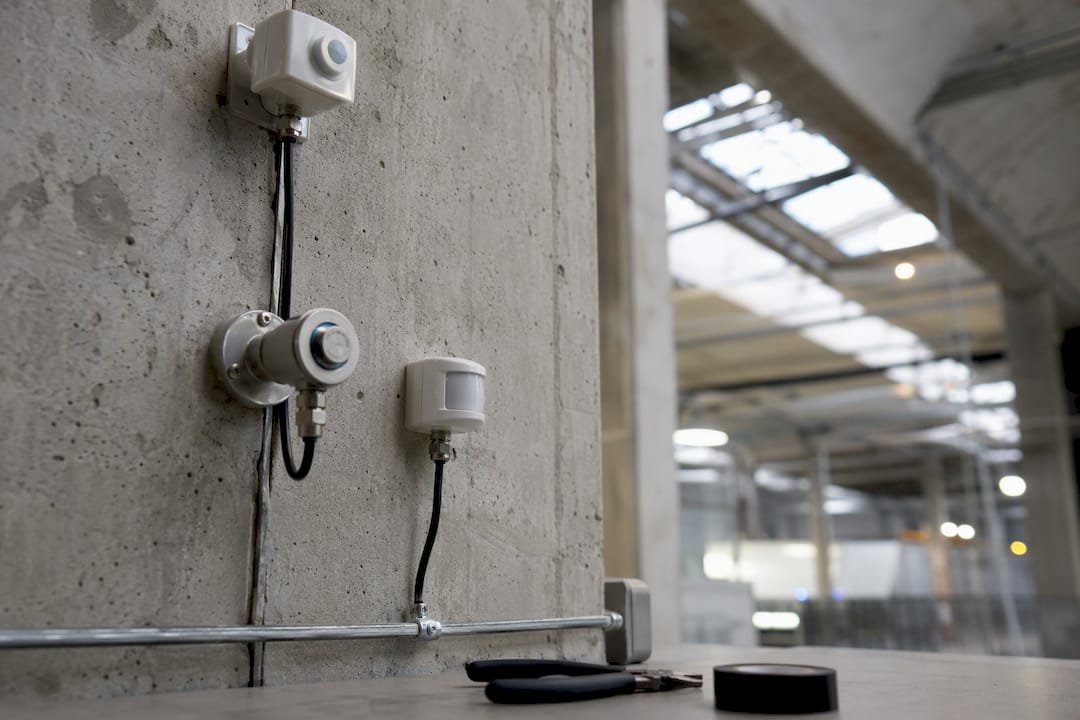
This layered structure is what IFMA describes as the building's digital nervous system, and understanding it changes how you troubleshoot. A dashboard glitch might actually be a field-layer sensor drift, not an application-layer bug.
Protocol choice matters more than most procurement teams realize. Favor open protocols like BACnet or Modbus over proprietary ones wherever possible; vendor lock-in at the control layer is expensive to reverse once you've installed a few hundred points. Carrier's building automation guidance points to IT/OT convergence as the central design concern for any project expecting to scale past a single pilot.
Security has to be designed in, not bolted on. Segment your OT network from your corporate IT network, plan certificate and identity management for every connected device, and set a patching cadence before you go live, not after an incident.
Device selection checklist:
- Match sensor specifications to environmental tolerances (temperature range, humidity, vibration).
- Confirm mounting and physical access for future calibration or replacement.
- Build a calibration schedule into the deployment plan, not an afterthought.
- Stock spare parts for high-failure-rate components before rollout, not after the first outage.
Pro Tip: Edge computing matters more than the spec sheet suggests. If a control decision needs to happen in milliseconds, don't route it through a cloud round trip. Keep latency-sensitive logic at the control layer.
Step 5: Plan and Run a Measurable Pilot
A pilot without a clear success threshold isn't a pilot, it's a demo. Pick one primary metric and two or three secondary metrics before you install anything. If the primary metric is energy kWh reduction, secondary metrics might be occupant comfort complaints and alarm volume, so you can catch unintended side effects.
- Finalize KPI definitions and baseline values from Step 2.
- Run Factory Acceptance Testing (FAT) on control panels and logic before shipping to site.
- Execute Site Acceptance Testing (SAT) once installed, verifying every point against the design list.
- Set acceptance criteria and name who signs off, and when.
- Collect data on a fixed schedule (daily trend logs are typical) for the full pilot window.
Skipping FAT is one of the most common causes of prolonged, disruptive site troubleshooting, and it's also one of the easiest steps to cut when a schedule slips. Don't cut it.
- Run pilots for 6 to 12 weeks, long enough to capture seasonal or occupancy variation.
- Set a mid-pilot checkpoint at week 3 or 4 to catch data quality problems early.
- Define stop conditions upfront: what result triggers pause-and-remediate versus scale-up.
Step 6: Validate ROI and Plan for Scale
ROI validation depends on the data you collected during the pilot, not on vendor projections. Track saved runtime hours, avoided repair costs, energy kWh saved against baseline, and labor hours reclaimed from manual monitoring. These four inputs, compared against pilot cost, give you a defensible number for the budget conversation.
Build a procurement scorecard before comparing vendors, weighting total cost of ownership, support service-level agreements, interoperability with your existing protocols, and the quality of training and documentation. A cheaper platform that locks you into proprietary hardware often costs more over five years than a slightly pricier open-protocol system.
- Score vendors on TCO, SLA response times, interoperability, and documentation quality.
- Tie contractual holdbacks to passed acceptance tests, not just delivery dates.
- Require budget sign-off from the same steering committee named in Step 1.
A phased five-step roadmap moving from digital record-keeping to asset registries to PM automation to IoT integration to full analytics tends to work better than a single big-bang rollout. Mid-size portfolios often complete the foundational stages in three to six months, with full analytics capability arriving over 12 to 24 months. Structure your rollout in site batches, with a validation gate between each batch confirming the pilot's KPIs held at the new scale.
Step 7: Commission, Test, and Hand Over the System
Commissioning is where good pilots either become reliable operations or become permanent troubleshooting projects. Run FAT before anything ships, SAT after installation, then point-to-point verification confirming every sensor and actuator reports and responds correctly. Verify sequences of operation against actual system behavior, not just the design document.
- Complete FAT on all control logic and HMI screens before site delivery.
- Run SAT and point-to-point verification for every installed point.
- Test each documented sequence of operation against live system response.
- Confirm pass/fail criteria are met and get written sign-off from the site owner.
Handover documentation should include the finalized sequence of operation, a complete point list with metadata, calibration records for every sensor, training logs, and a maintenance schedule. Without these, your operations team inherits a black box.
- Require sign-off from both the technical lead and the facility manager, not just one.
- Build in a 30 to 60 day post-handover support window before the vendor relationship goes quiet.
Step 8: Build Change Management Into Daily Operations
Technology rarely fails automation projects. Adoption does. Intuitive dashboards, clear operational benefits, and real staff education determine whether your new system gets used or gets ignored after month two.
Build a training plan naming the audience (operators, technicians, facility managers), the specific learning objectives, and hands-on sessions with the actual dashboard, not a slide deck. Pair every training session with written documentation the team can reference three months later when memory fades.
- Define training audiences and objectives before scheduling sessions.
- Deliver hands-on training on live dashboards, not simulated screenshots.
- Document standard operating procedures for the five most common tasks.
- Set escalation paths for alarms that exceed a defined severity threshold.
- Configure dashboards to surface only actionable alarms; alarm fatigue defeats the purpose of automation fast.
- Schedule recurring sensor calibration and firmware updates as a standing calendar item, not a reactive task.
Pro Tip: Ask your operators what they'd remove from the dashboard before you ask what they'd add. Most alarm fatigue comes from noise nobody has bothered to clean up.
What Are the Most Common Facility Automation Pitfalls?
Missing or outdated sequences of operation top the list. If nobody can produce a current SOO, new controls almost always get mis-tuned. Noisy or gap-filled trend logs are another warning sign, usually meaning a sensor is drifting or a communication link is dropping intermittently.
- Missing sequence of operation documentation.
- Trend logs with unexplained gaps or erratic values.
- Sensors nobody has calibrated in over a year.
- Alarm volume so high that operators start ignoring notifications.
Mitigation is usually straightforward once you name the problem: recalibrate suspect sensors, suppress duplicate alarms at the source rather than downstream, update stale sequences before expanding scope, and extend FAT coverage if site issues keep recurring. If baseline data still looks untrustworthy after remediation, pause the rollout. Scaling automation on top of bad data multiplies the bad data, it doesn't fix it.
A Sensor-First Approach to Facility Automation
Sensors are the foundation everything else in this playbook depends on. Wireless retrofit sensors and edge gateways make sensor-first modernization achievable at a fraction of the cost of full controller replacement, and that's the approach Beyondsensor builds its deployment methodology around.
Specification matters before installation. Match sensor type to the actual environmental conditions: vibration tolerance for rotating equipment, IP-rated enclosures for outdoor or wet locations, and battery life appropriate to your maintenance access schedule. A sensor mounted in an inaccessible ceiling void needs a multi-year battery, not a six-month one.
Deployment checklist for a sensor-first pilot:
- Confirm mounting location allows line-of-sight or adequate signal strength to the nearest gateway.
- Plan field wiring or battery power options before installation day, not during it.
- Verify environmental tolerances (temperature, humidity, dust ingress) against manufacturer specifications.
- Document each sensor's location and ID in the point list before commissioning starts.
Integration with gateways and the supervisory layer is where sensor-first projects often stumble. The common pitfall is treating gateway configuration as an afterthought once sensors are already mounted. Configure gateway addressing and protocol mapping before physical installation, so you're not troubleshooting connectivity from a ladder.
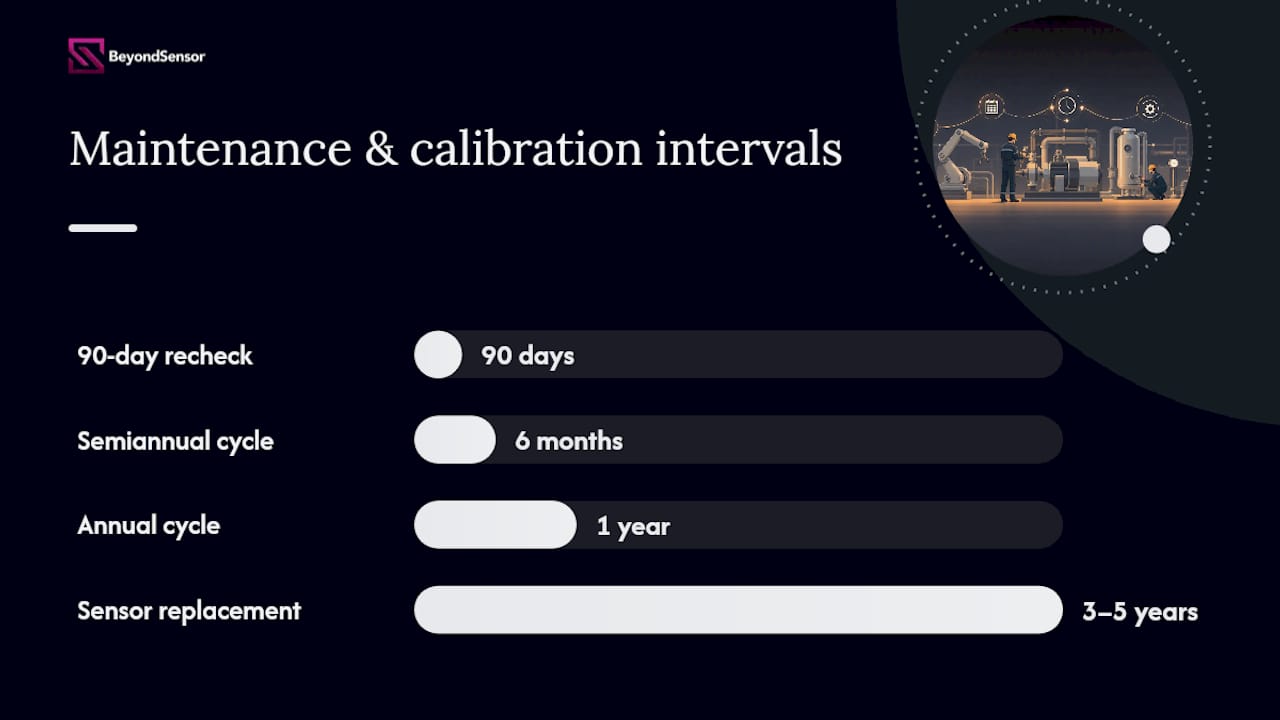
A practical calibration schedule looks like this: verify accuracy at installation, recheck at 90 days to catch early drift, then move to an annual cycle for stable environments or a semiannual cycle for harsh ones (high vibration, temperature extremes, or heavy dust). Budget for sensor replacement on a three to five year cycle depending on environmental exposure, and track spare inventory for your highest-failure sensor types.
Pro Tip: Order 10 percent spare sensors with your initial deployment. Waiting on a reorder for a single failed unit can stall an entire pilot's data collection for weeks.
For teams building out the full sensor-first process from audit to measurable outcomes, the same phased logic applies at every scale: narrow scope, trustworthy data, then layered analytics. That sequencing, not the sophistication of any single sensor, is what separates a pilot that scales from one that quietly dies after year one.
What I Learned From a Pilot That Almost Failed
The most common delivery mistake isn't technical, it's sequencing. Teams frequently jump to selecting a platform before anyone has agreed on what success looks like, and by the time KPIs get defined, the technology choice has already boxed in the answer. The fix is almost always the same: force the KPI conversation before the vendor conversation, even when it feels like it's slowing things down.
The one lesson worth carrying into your first pilot: a two-week delay upfront to nail down governance and baseline data saves months of rework later. Facility managers who resist the urge to skip Step 1 consistently end up with pilots that actually survive their go/no-go review.
How Beyondsensor Supports Your Automation Pilot
Beyondsensor gives facility teams a faster path to trustworthy pilot data than building a sensor stack from scratch and hoping the integration holds. Rather than assembling hardware, gateway configuration, and analytics dashboards from three separate vendors, you get sensor deployment, gateway integration, and analytics enablement designed to work together from day one, which cuts the integration guesswork that stalls most first pilots.

A typical Beyondsensor pilot engagement runs on the same 6 to 12 week timeline outlined in Step 5: sensor deployment and calibration in weeks one and two, data collection through the pilot window, and a validated KPI report you can take straight into your ROI and procurement conversation. Deliverables include a point list, calibration records, and a dashboard configured around the KPIs your steering committee already defined in Step 1.
If you're a system integrator or facility team ready to scope a pilot, start with Beyondsensor's solutions for system integrators to see how a sensor-first deployment fits your specific site architecture, or browse the technical utilities and planning tools built to support exactly this kind of phased rollout.
Sources
Consult ASHRAE Guideline 36 for consistent HVAC control sequence intent, and ASHRAE Standard 135 for BACnet protocol specifics when evaluating open-protocol compatibility.
- Building Automation Systems (BAS): A Practical Guide for Facility Manager | International Facility Management Association
- How to automate your plant | PLC Exchange
- Digital Transformation in Facility Management: A Practical 5-Step Roadmap
- Automate Facility Maintenance Requests & | LOW/CODE
Recommended
- Facility Automation Process 2026: A Sensor-First Playbook | News | BeyondSensor
- Smart Facility Integration Ideas for Facility Managers | News | BeyondSensor
- Industrial Automation Checklist: Plan, Pilot, and Deliver | News | BeyondSensor
- Automation Challenges Checklist for Project Managers | News | BeyondSensor
Read More Articles
RTSP Security Risks: Integrators Must Block Exposed Ports 554 and 8554
See how integrators can reduce RTSP security risks: close exposed ports 554 and 8554, secure camera access, and verify each deployment with practical checks.
Require MAEpp and X Accuracy Before You Buy People Counting Systems
Verify people counting accuracy by demanding MAEpp, X Accuracy, and directional-bias reports. Validate on-site with at least 100 events per direction...
30–90 Day Pilot Validates Redundant Camera Networks for Engineers
Standards led, practical steps for engineers to deploy redundant camera networks: MRP, dual homing, and aggregation patterns, commissioning checks, and...
30 Day Pilot Proves Video Analytics Accuracy for Security Teams
Validate video analytics accuracy with scenario tests, camera tuning, transfer learning and a 30 day edge first pilot for security teams.
Let's Build YourSecurity Ecosystem.
Whether you're a System Integrator, Solution Provider, or an End-User looking for trusted advisory, our team is ready to help you navigate the BeyondSensor landscape.
Direct Advisory
Connect with our regional experts for tailored solutioning.