Explore this comprehensive infrastructure surveillance integration guide to learn how to optimize your facility's security with expert insights and top tools.

Infrastructure Surveillance Integration Guide for Facilities

TL;DR:
- Effective infrastructure surveillance integration combines hardware, network design, and AI analytics to ensure reliable, scalable security systems. Proper planning involves static IP assignments, dedicated VLANs, appropriate stream configurations, and thorough documentation to prevent common failures. Future-proofing relies on modular hardware, AI-driven detection, role-based access, and ongoing testing to maintain optimal performance over time.
Infrastructure surveillance integration is defined as the process of combining CCTV cameras, recording devices, network infrastructure, and video management software (VMS) into a single, unified security system. Security professionals know this practice by its industry term: physical security system integration. This guide covers the full process, from hardware selection and network configuration to AI-driven analytics and long-term scalability. Whether you manage a single facility or a distributed campus, the decisions you make at the design stage determine whether your system performs under pressure or fails when it matters most. Key platforms like Hikvision, Dahua, and Milestone XProtect define the hardware and software landscape you will work within.
What tools and hardware are required for infrastructure surveillance integration?
Effective surveillance system setup begins with selecting the right hardware stack. The core components are PoE IP cameras, a Network Video Recorder (NVR) or Digital Video Recorder (DVR), structured cabling, and a VMS platform. Each component must be chosen with interoperability in mind, not just individual performance.
Hardware options and selection criteria
| Component | Options | Key Consideration |
|---|---|---|
| Cameras | PoE IP, PTZ, fisheye | Resolution, field of view, IR range |
| Recorders | NVR (IP), DVR (analog) | Channel count, storage capacity |
| Cabling | Cat6, Cat6A, coaxial | Distance limits, PoE power delivery |
| VMS Software | Milestone XProtect, Genetec, Dahua DSS | Open platform vs. proprietary |
| Access Control | HID, Lenel, Bosch | Integration with VMS via SDK |
Network configuration is where most integrations fail before they start. Assign every camera a static IP address and place all surveillance traffic on a dedicated surveillance VLAN to prevent DHCP-related disconnections and shared network congestion. Apply Quality of Service (QoS) rules to prioritize video traffic over general data.
Cabling discipline separates professional installations from problem-prone ones. Run 10–15% extra cable per run to accommodate routing obstacles, conduit bends, and future termination changes. That slack prevents re-pulls, which are costly and disruptive. For organized cable management at the recording hub, follow professional cabling standards that include labeled patch panels, velcro ties, and documented port assignments.
The recording hub itself requires physical security and environmental controls. Mount NVRs in a locked rack enclosure with adequate ventilation. Heat buildup in poorly ventilated closets is a leading cause of NVR failure in the field.
Pro Tip: Use a dedicated UPS (uninterruptible power supply) for your NVR and network switch. A 15-minute battery backup prevents recording gaps during brief power interruptions, which are common in industrial facilities.
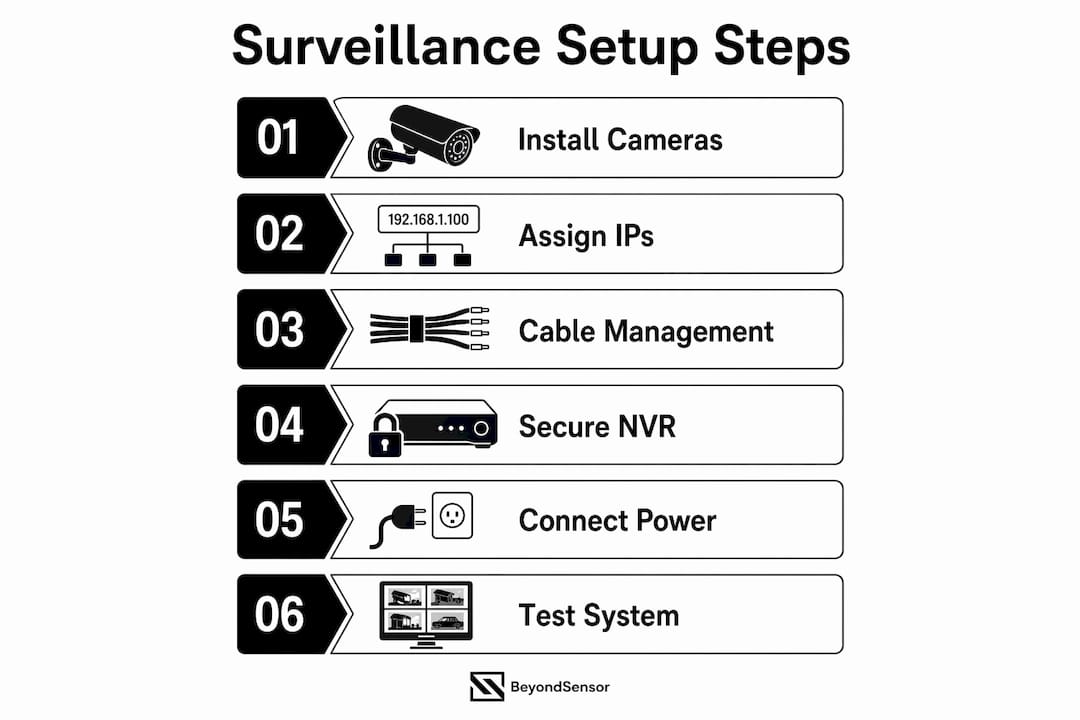
How do you execute the step-by-step integration process?
A structured workflow prevents the most common integration errors. Follow this sequence for any facility, from a 4-camera retail space to a 200-camera industrial complex.
- Map coverage areas. Walk the site and identify every entry point, blind spot, and high-value asset. Mark camera positions on a floor plan before ordering hardware. Coverage gaps discovered after installation are expensive to fix.
- Run and label all cabling. Pull cables before mounting cameras. Label both ends of every run with a unique identifier. A network closet organization standard applied at this stage saves hours during troubleshooting later.
- Mount cameras and secure the NVR. Install cameras at the planned positions. Lock the NVR in a ventilated, access-controlled enclosure. A standard DVR installation covering 4–8 cameras takes 2–4 hours with basic proficiency. Larger NVR deployments scale linearly with channel count.
- Configure the network. Create a dedicated VLAN for surveillance traffic in your managed switch. Assign static IPs to every camera using a documented IP address scheme. Set firewall rules to block direct internet access from camera IPs.
- Add cameras to the VMS. Open your VMS platform (Milestone XProtect, Genetec Security Center, or Dahua DSS) and add each camera by IP address. Verify the VMS discovers each device without errors before proceeding.
- Configure video streams. Set the primary stream to high resolution for recording, such as 4K at 15fps. Set the secondary stream to a lower resolution, such as 720p at 10fps, for live monitoring. This split reduces bandwidth load significantly without sacrificing recorded image quality.
- Set retention policies. Configure storage to meet your organization's retention requirement. Industry-standard retention runs 14–30 days for general surveillance. Critical infrastructure sites often require 60–90 days. Size your storage accordingly before going live.
- Test all functions. Verify live view, motion detection triggers, mobile app access, and alert notifications. Test recording playback for every camera. Document any failures and resolve them before signing off on the installation.
Pro Tip: Test mobile app access from outside the facility network using LTE, not just the internal Wi-Fi. Remote access failures are often firewall or port-forwarding issues that only appear when you leave the building.
Primary vs. secondary stream configuration
| Stream Type | Resolution | Frame Rate | Purpose |
|---|---|---|---|
| Primary | 4K (3840×2160) | 15fps | Recording to NVR storage |
| Secondary | 720p (1280×720) | 10fps | Live view on VMS and mobile |
What are common challenges when integrating surveillance systems?
Every integration encounters problems. Knowing the failure modes in advance lets you resolve them in minutes instead of hours.
- Network failures from shared Wi-Fi. The transport layer is the most common point of failure in surveillance integrations. Cameras connected over shared Wi-Fi experience packet loss, which causes dropped frames and VMS disconnections. Use wired PoE connections for every camera, without exception.
- IP address conflicts. DHCP assigns addresses dynamically, which means a camera's IP can change after a router reboot. When the IP changes, the VMS loses the connection. Assign static IPs to all cameras and document every assignment in a spreadsheet or IP management tool like SolarWinds IP Address Manager.
- Stream configuration errors. Sending 4K primary streams to the live view monitor consumes bandwidth that should be reserved for recording. Always route live monitoring through the secondary stream. This single configuration change resolves most bandwidth complaints in multi-camera deployments.
- Storage undersizing. Facilities that skip storage calculations before deployment run out of disk space within days. Use a CCTV storage calculator to estimate required capacity based on camera count, resolution, frame rate, and retention period before purchasing drives.
- Weak credentials and open ports. Default passwords on cameras and NVRs are the most exploited vulnerability in physical security systems. Change every default credential on day one. Enforce strong passwords and network segmentation across all devices, and disable any remote access ports that are not actively required.
"Proper documentation and IP management greatly reduce downtime and troubleshooting complexity in large-scale surveillance deployments." — Beyondsensor
Pro Tip: Create a master integration document that records every camera's IP address, MAC address, physical location, cable label, and VMS channel number. Update it every time you make a change. This document becomes your fastest diagnostic tool when something goes wrong at 2 a.m.
What best practices future-proof your surveillance infrastructure?
Systems designed only for today's camera count become liabilities within three years. Build for expansion from the start.
- Use modular hardware. Select NVRs and VMS licenses that support incremental channel additions. Modular and scalable systems using cloud or hybrid storage allow gradual expansion without replacing core infrastructure. This approach protects your initial capital investment.
- Adopt micro-segmentation. Network micro-segmentation isolates surveillance traffic at the device level, preventing a compromised camera from becoming a lateral entry point into production systems. This is non-negotiable for facilities with 24/7 operations.
- Integrate AI analytics. AI agentic security systems shift monitoring from reactive human dashboards to proactive, context-aware threat detection. Vision Language Models (VLMs) and anomaly detection algorithms identify threats before operators notice them. The future of security infrastructure is AI and IoT integration working together, not cameras feeding passive screens.
- Implement role-based access control. Role-based access in VMS systems ensures that operators see only the cameras relevant to their function. This reduces insider risk and supports compliance audits.
- Plan distributed command centers. Large facilities benefit from zone-based monitoring stations rather than a single central room. Distribute VMS clients to department supervisors with read-only access to their zones. This model scales without adding headcount.
| Practice | Benefit | Implementation Tool |
|---|---|---|
| Hybrid cloud storage | Redundancy and remote access | Genetec Stratocast, Milestone Care |
| Network micro-segmentation | Breach containment | Barracuda CloudGen Firewall |
| AI anomaly detection | Proactive threat identification | VLM-based analytics platforms |
| Role-based VMS access | Compliance and insider risk reduction | Milestone XProtect, Genetec |
| Modular NVR expansion | Cost-controlled growth | Hikvision DeepinMind NVR series |
Key Takeaways
Effective infrastructure surveillance integration requires disciplined network design, correct stream configuration, and modular architecture built for expansion from day one.
| Point | Details |
|---|---|
| Static IPs and VLANs are non-negotiable | DHCP and shared Wi-Fi cause the majority of VMS disconnections in production systems. |
| Stream configuration drives bandwidth efficiency | Use secondary streams at 720p for live view; reserve primary 4K streams for recording only. |
| Storage must be calculated before deployment | Size NVR storage using retention targets of 14–30 days minimum before purchasing hardware. |
| Documentation prevents operational failures | Record every IP, cable label, and VMS channel assignment in a master integration document. |
| AI integration is the next performance threshold | Proactive AI analytics outperform reactive human monitoring for threat detection at scale. |
Why network design is the real foundation of surveillance integration
I have reviewed integrations that looked perfect on paper and failed within 72 hours of going live. The cause is almost always the same: the transport layer was treated as an afterthought. Cameras were placed on shared office VLANs, IPs were left on DHCP, and the VMS was expected to compensate for an unstable network. It cannot.

The insight that changed how I approach every deployment is this: a surveillance system is only as reliable as its network. The cameras, the NVR, the VMS software, all of it becomes irrelevant if the packets do not arrive intact. I now treat network design as the first deliverable, not a supporting task.
The second thing I advocate for consistently is the secondary stream configuration. Most operators running live view on primary 4K streams do not realize they are consuming three to four times the bandwidth they need for monitoring. Switching to a 720p secondary stream for live view costs nothing and resolves bandwidth complaints immediately.
On AI integration: the shift from reactive monitoring to proactive exception-based monitoring is not a future trend. It is available now, and facilities that delay adoption are accepting a performance gap. AI never blinks, does not experience alert fatigue, and processes multiple streams simultaneously. The operational case for integrating AI analytics into your VMS is already closed.
My final recommendation is continuous testing. Do not treat the sign-off walkthrough as the end of the process. Schedule quarterly reviews of motion detection accuracy, storage utilization, and remote access reliability. Systems drift. Cameras shift. Firmware updates change behavior. The teams that catch these changes early are the ones whose systems perform when an incident actually occurs.
— Eumir
How Beyondsensor supports your integration from design to deployment
Beyondsensor builds the tools and partnerships that security professionals and system integrators need to execute complex surveillance deployments with confidence.

From AI-powered anomaly detection to physical security integration frameworks, Beyondsensor's platform is designed for the realities of industrial and smart infrastructure environments across Singapore, Malaysia, and the Philippines. System integrators working on large-scale deployments can access tailored AI surveillance solutions, ecosystem matchmaking, and technical validation support through the Beyondsensor system integrators page. If you are sizing storage for an upcoming project, the Beyondsensor CCTV storage calculator delivers accurate capacity estimates in minutes.
FAQ
What is infrastructure surveillance integration?
Infrastructure surveillance integration is the process of connecting cameras, NVRs or DVRs, network equipment, and VMS software into a unified security system. The goal is centralized monitoring, reliable recording, and coordinated incident response across a facility.
How long does a standard surveillance system setup take?
A 4–8 camera DVR installation takes approximately 2–4 hours with basic proficiency. Larger NVR deployments with network configuration and VMS setup typically require one to three days depending on site complexity.
Why should cameras use static IPs instead of DHCP?
DHCP assigns addresses dynamically, meaning a camera's IP can change after a network reboot. When the IP changes, the VMS loses the connection. Static IPs keep every camera reachable at a known address, which is the foundation of a stable integration.
What is the recommended footage retention period?
Industry-standard retention runs 14–30 days for general surveillance. Critical infrastructure and regulated environments often require 60–90 days. Calculate storage capacity against your retention target before purchasing drives.
How does AI improve surveillance system performance?
AI analytics enable proactive, context-aware monitoring by detecting anomalies before human operators identify them. This shifts security operations from reactive dashboard watching to exception-based monitoring, which reduces response times and improves incident capture rates.
Recommended
- Why Choose Integrated Security Systems for Facilities | News | BeyondSensor
- How to Secure Facilities with Advanced Sensor Technology | News | BeyondSensor
- Streamline smart infrastructure security: a step-by-step guide | News | BeyondSensor
- The Role of Sensors in Infrastructure: 2026 Guide | News | BeyondSensor
Read More Articles

Automation Challenges Checklist for Project Managers
Discover key hurdles in your projects with our automation challenges checklist. Identify risks early and ensure successful deployments.

Sensor Integration Step by Step: A Project Manager's Guide
Discover the sensor integration step by step process for successful project management. Master the phases to ensure reliable performance!

Why Security Audits Are Essential for Risk Management
Discover why security audits are essential for effective risk management. Uncover benefits that strengthen compliance and enhance security.

Top 5 SecuritySensor.sg Alternatives 2026
Explore 5 top securitysensor.sg alternatives to help businesses choose efficient security systems for enhanced protection and reliability.
Let's Build YourSecurity Ecosystem.
Whether you're a System Integrator, Solution Provider, or an End-User looking for trusted advisory, our team is ready to help you navigate the BeyondSensor landscape.
Direct Advisory
Connect with our regional experts for tailored solutioning.